Rich posted a couple photos of his HDR imaging trials, which got me to thinking about this post-processing technique.
Basically the idea of HDR (or High Dynamic Range) photos is that standard photos don't include all the information that your EYE sees. Your eyes pick up a lot of detail in the light and dark areas, but when this is interpreted by a camera sensor you get lots of pure white and pure black with no detail. One way to fix this is to take multiple exposures and merge them together into one image with the detail from all three.
So you would take one dark image (underexposed) which shows the detail in the bright areas, one normal exposure image which is where your midtone information will come from, and one bright image (overexposed) which has all the shadow detail. Ideally these would all be taken with a tripod so that you don't have any alignment issues. You then use a program like Photoshop to merge these three images together.
The problem with this? Well your monitor isn't designed to display the wide variety of tones that are now present in your picture, so it makes some concessions. Generally you end up with a lot of detail, but they also lack a lot of the color. So to fix this you have to tone-map your image. Basically, this is a means of 'dumbing down' your image so that you can get the best possible color display out of a low-dynamic-range device (like your monitor or printer) while maintaining the detail of your HDR image.
This tone-mapping is where the photographer has to decide how vibrant they want their image to be. If you overdo it you get an image with ridiculous "clown" colors, like this:

If you under-do it, you don't get as much color as you might want:
 Photo by gilbrit
So, ever since getting my G9 which has auto exposure bracketing, I have been playing with HDR and trying to figure out a workflow that creates images that don't look too ridiculous to me. These are a few things that I have learned:
- Photoshop CS3 is great at aligning images (WAY better than CS2 was). I don't ever take a tripod with me, so all images are handheld and therefore imperfectly aligned.
- Determining how wide your exposure bracketing needs to be for a given shot is important. Otherwise you end up with some very goofy and unflattering images.
- Watch out for the little things that won't be the same in your images. Is the wind flapping a flag in the background? Did a car pass behind your subject in one of the exposures? Yeah, you are going to have to fix that. Otherwise you get ghosts in your HDR image.
- HDR doesn't always look better than a normal exposure. Not by a long shot. A lot of times it's those shadows and highlights that add the artistic bit to a picture which make it really interesting.
- After creating your HDR image in photoshop, save it as a radiance file, not a PSD file! Otherwise you lose all the HDR info and then you cannot tone-map it correctly.
- You can create an HDR from one RAW image. So if you only snagged one exposure of something, but really want an HDR from it, you can do it!
So, after a few lessons learned I have finally found a workflow that is getting me results that I like. I don't LOVE them, but they are okay. As usual, there is lots to learn before I get to where I want to be, but the journey so far is fun!
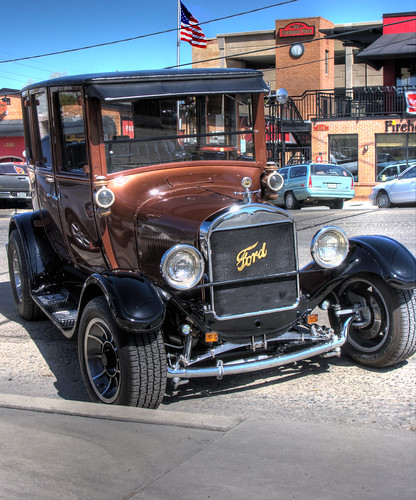
Here is an HDR I took this weekend of an old Ford parked downtown:
2 comments:
Listen, I'm just starting to get to grips with my little point and shoot ... don't you start confusing me again!
That is a cool picture of the car though. x
Sorry Kitty. It's the darn geek inside of me that writes these posts. Who knows, one day you might be creating HDRs from that little point and shoot. :)
And how are you liking that camera so far?
Post a Comment